Setting up a Tor Docker Snowflake proxy on a QNAP NAS
12/04/24
An always on snowflake proxy's probably the easiest way to contribute spare computing resources to the Tor project. If you've got a Container Station capable QNAP, running a Snowflake Docker image is a synch. Here's how to do it in CS3.
Note: To save space screen shots don't necessarily show unused controls. If a control's just mentioned by name it'll be on your live version somewhere. Unless mentioned ignore any other available settings.
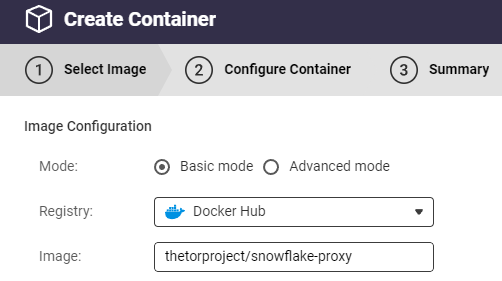
Start the container creation wizard
Set the Docker image name to thetorproject/snowflake-proxy and click Next.

Choose a name for the container
E.g. SFP

Click Advanced Settings.
Create the command line
Set it to -capacity 1000 -ephemeral-ports-range 32768:60999

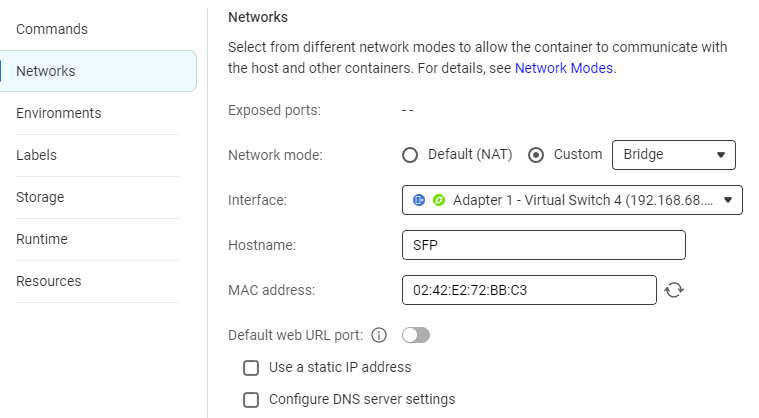
Create the network
Change Network mode from Default to Custom>Bridge and as Interface select an adapter/virtual switch directly connected to your internet router LAN. This is the surest way to avoid NAT issues and simplest to configure port forwarding on.
Choose the Hostname you'd like the snowflake to show as on your LAN.
By default the MAC address is blank. Use the recycle icon for a system selected address to be shown or type one of your own. Either way it's best to supply something as otherwise the MAC address is prone to change on container restart.
It's fine to set a static IP if you like or just leave as the default DHCP assigned.
Configuring DNS server settings to something known good (e.g. 8.8.8.8, 8.8.4.4) removes the chance of your QNAP getting this bit wrong.

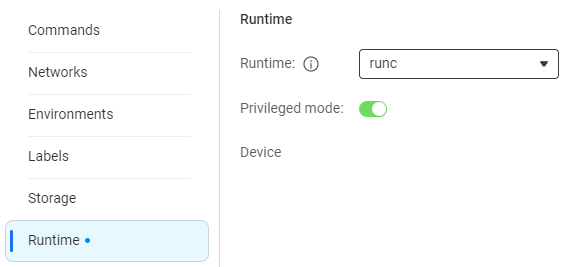
Set runtime permission
The container needs elevated permissions so toggle Privileged mode on. These permissions are internal to Container Station, not system wide.

Click the Apply button. Reopen Advanced Settings and double check things are as they should be. Adjust and Apply again if they're not, close Advanced Settings then click Next if they're good.
Triple check the summary then click Finish.
Check it's up and running
It may take a few minutes to pull the docker image and start up the container first time round. Once it's up you'll see 'Proxy starting' in the container log window followed by 'NAT type: restricted','NAT type: unknown' or 'NAT type: unrestricted'.
After about an hour you'll get its first log message showing the number of connections.

Yes, underwhelming to say the least.
Change to unrestricted mode
By default your snowflake proxy will probably be running in restricted or unknown mode. In these states it's functional but will only be useable by a fraction of potential clients. These will have particular and uncommon firewall/lan configurations.
To make it available to people on normal home or public networks the proxy has to be switched to unrestricted mode by port forwarding UDP traffic from your internet connected firewall/router to the snowflake container.
The ports to forward were set as 32768 through to 60999 in the command line. These are the official defaults. The destination address is that of the snowflake container, which you can find either in Container Station or your router.
After setting up forwarding and restarting the container you should see it switched to unrestricted and again an hour later its first log message, this time showing a healthy number of connections.

Control bandwidth
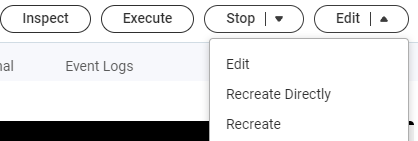
The snowflake proxy doesn't have in-built bandwidth management. The closest it gets is allowing the maximum number of concurrent client connections to be specified which is blunt but does at least tame bandwidth consumption if necessary. The max number is set in the command line, in this example 1000. To change it go to the Recreate container option and work through until you find the command line setting which you'll be able to edit accordingly.

It seems that sometimes the maximum concurrent connections are self limited to around 20 regardless of the value set in the command line. If this is the case for you the simplest workaround is just to create some more snowflake docker containers.
If you feel up to it and your equipment permits, applying bandwidth policy through your firewall/router is likely a better solution. Here's an example of how to do it with Pfsense. It's mainly about allowing only certain countries but the bandwidth control can be applied even if you're happy to open your relay or snowflake worldwide.